As a publisher of content that either ends up online as a blog post, electronically in an e-book, or in a printed book, here are the tools and processes I use to create content (thus far, I promise to update this whenever necessary).
I rely on two core tools to create and organize content:
Scrivener ($40)
This writer’s jack of all trades, which made its debut in 2007, has an overly complicated feature set that only a nerd could love. Yet despite a dense jungle of options, it’s relatively easy to learn, especially if you watch a video like “Scrivener for Dummies” by Greg Gountanis:
Scrivener lets you organize your content in a non-linear fashion, allowing you to create a mashup of folders and files that can have their own sub-folders and files. Why a file can even have a sub-file. You can also change folder and file icons to make them easier to recognize visually. You can even colorize backgrounds and choose fonts to customize Scrivener to your heart’s content.
Once all the content is organized the way you like, you can publish it instantly to PDF or e-book by “compiling” your content. While navigating Scrivener’s multitude of settings and options is a confusing nightmare, the program still shines once you compare it to the competition.
iA Writer ($30)
iA Writer is a venerable cross-platform tool, launched in 2010, that synchronizes seamlessly via iCloud with an iPad app ($30). Scrivener’s publisher, Literature & Latte, chose a more complicated Dropbox approach. Product reviews suggest that process is not as seamless because Scrivener lacks a live-synching capability, requiring you to close your desktop app before using your iOS app ($20).
Another thing of note, Literature & Latte hasn’t updated its iOS app in a year, which does not inspire much confidence in branching out to a mobile platform.
That’s why I prefer copying my research content from Scrivener into iA Writer before starting to write. This process also allows you to have a cloud-based backup of all your writing, not that Scrivener has ever lost anything of mine in more than eight years of using the tool. iA Writer, like Scrivener, boasts a composition mode that lets you eliminate background clutter so you can focus on writing. Scrivener even lets you control background transparency for those suffering from FOMO.
But iA Writer goes one step further by including the ability to color identify adjectives, nouns, adverbs, verbs, and conjunctions. This feature is particularly helpful if you’re the type of writer who overuses words like “game-changer.” Like Scrivener, iA Writer can export to HTML and Microsoft Word, but only Scrivener imports Word files. Both tools also let you export to Markdown (iA Writer) and MultiMarkdown (Scrivener).
iA Writer is not without its shortcomings. Finding the folder where iA Writer stores its files is a bit of a hassle, but most of the time, you don’t have to worry about this. Since its files are natively stored in .txt format, iA Writer is much easier to deal with when it comes to recovery than either Scrivener or the next one up, Bear, which both use a proprietary database of files.
I also find that iA Writer’s drag-and-drop process is not always as smooth as it should be, particularly when trying to make a selection that can be dragged.
Bear (free or $15/yr. with iCloud synching)
Many writers also recommend Bear, which has a gorgeous interface, can sync with iOS apps, and, like Evernote, offers the ability to clip articles from the web using a browser extension that unfortunately only works in Safari. Using Bear for writing, however, presents a few challenges.
The main problem with Bear is that it relies on a hashtag scheme to organize notes. Like Scrivener, Bear uses a three-pane window with a tag list on the left (called “Binder” in Scrivener), a notes list in the middle, and an editor on the right. The tag list is either shown in alphabetical order or ranked by the number of tagged notes.
iA Writer only lets you organize files in date order, which is even less flexible. That’s an area where Scrivener shines; it allows you to move things around and put them in the preferred order.
And neither iA Writer nor Bear let you select a group of documents or notes and view them in a contiguous view, a compelling Scrivener feature.
Here’s how Bear’s hashtag feature can sometimes get in the way of organizing content. For my LOCKDOWN book, I tagged the foreword like this:
#lockdown/0. foreword#
Unfortunately, Vellum, another tool I use for the final output of e-books and printed books, does not recognize “0” chapters. Scrivener once again comes to the rescue by offering a “Front Matter” folder.
Using section or chapter numbers in Bear notes is a requirement because Bear does not let you change the notes list order, and the order of the notes determines chapter order. Tagged notes are either sorted alphabetically or by creation or modification date. You could, of course, edit files in reverse order, say, from chapter six to one, but that’s a workaround and not optimum.
Shiny Frog, Bear’s publishers, grappled with this problem in their set of built-in “welcome” files by using alphabetically ordered tag names and note titles, i.e., “Getting Started,” “Organize,” “Pro,” “Publish,” and “Tips and Tricks.” For book authors, that’s a well-nigh impossible task. Tags do allow for some nice tricks, here’s one Shiny Frog used to have notes show up in different “welcome” sections:
#welcome/organize #welcome/publish
If you do insist on using Bear to write long documents, here are some tips. Since all tags must be organized by hierarchy or they show up randomly in the list, use a numbered taxonomy in Bear:
#book title/1. Chapter Title#
Do not use section topics in a chapter or note; instead, create a new tag for each section. You can always merge notes later to combine sections if needed. For my LOCKDOWN book, for example, I used this taxonomy:
#lockdown/4. the evidence/accidental leak#
Of course, as you can imagine, sections will also end up in random order unless you number or alphabetize them too:
#lockdown/4. the evidence/a. accidental leak#
I moved any research to its own subtopic under book research:
#book research/Wuhan Institute of Virology#
That way, you keep extraneous items outside your story flow. Scrivener makes this easier by offering default “Notes” and “Research” folders.
In summary, I don’t use Bear for writing, only for storing personal notes captured from the web (for business research, I use Evernote). Here is why:
- Cumbersome – Tag organization is unnecessarily constrained and challenging to execute correctly, particularly for long documents. Two-word tags require enclosing the second term in another tag. All my personal notes have simple tags, i.e., finance, food, gear, home, etc.
- Tag selection – Bear does not allow for a non-contiguous selection of tags, which means that any long-form document will most likely have to be exported by individual tag. As a result, some actual “notes” may get mixed in with chapter content.
- Note selection – There is also no contiguous or random selection or notes to view and edit multiple notes as one, like Scrivener.
Notion is a heavyweight contender for the content workflow market. The San Francisco-based startup has raised a total of $67 million and is valued at $2 billion based on its innovative application which combines note taking, task management, flexible templates and multiple views. The above video shows how to create a powerful task management system in Notion so you can fast-track your book project.
Ulysses ($6/mo.; $50/yr.)
Another writing tool that others rave about is Ulysses. But this app also suffers from usability issues:
- Links – In both iA Writer or Scrivener, invoking Command K instantly inserts a hyperlink. In Ulysses, there is one extra step; you have to paste the link into the pop-up dialog box. Links are also hidden from view and require another click to view. Ulysses also does not allow you to customize links. After exporting stories to WordPress, you have to laboriously add target=”_blank” to each link to get them to open up in a separate window.
- Grammarly – Many writers, myself included, use Grammarly to spellcheck final documents. Unlike iA Writer, you can’t just copy and paste text from Ulysses into Grammarly because links get left behind. That means exporting Ulysses documents to Microsoft Word files so you can spellcheck them using Grammarly’s Word extension. However, editing in Microsoft Word with its unintuitive word-selection feel is an unpleasant experience, to say the least.
- Markdown – Ulysses uses a proprietary file format. To export in markdown, you have to create an external folder and drag Ulysses’ “sheets” to that folder. You also have to uncheck the default “Create reference links” because that turns each link into a reference (footnote) link.
Like Bear and iA Writer, Ulysses uses underscores to mark _italic text_ which also leads to parts of hyperlinks being italicized, a minor aesthetic issue in Bear and iA Writer but not in Ulysses, which hides links from view. Of course, that also means that you cannot directly edit a link.
Online Workflow
My workflow for blog posts is as follows:
I use Scrivener to write short blog posts using no paragraphs. The reason is that Scrivener insists on adding
<p><br></p>
between paragraphs when exporting to HMTL. If you export many HTML files at once from Scrivener, use the free MassReplaceIt app to get rid of these irritants.
I do not add links directly in Scrivener, because like Ulysses, Scrivener embeds them and makes linked text impossible to cut and paste to Grammarly and back. Instead, leave links at the end of each paragraph and embed them in WordPress.
As a result, it’s best to use WordPress’ Code editor to begin editing and embed links using a macro program like TextExpander or Alfred (which I have not used). Alternatively, you can switch to the Visual editor once you have begun editing to embed links, add images, and then change back to the Code editor. The Visual editor tends to add unwanted junk, like tags between paragraphs when editing stories.
Once a WordPress post is final, I cut and paste the story into an Airtable base, which helps tracks status, publish date and also has a field that automatically calculates the word length of excerpts to keep them of consistent length (WordPress only counts words, not characters, in determining when to end an excerpt brutally). Airtable also helps standardize categorization and tagging.
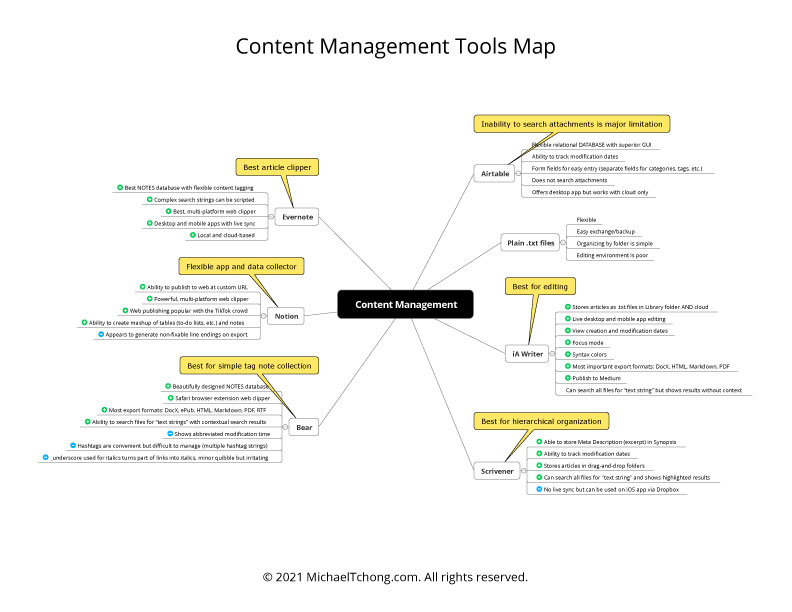 This article may be a little much to take in all at once, so how about a visual content tools roadmap (PDF; 254KB) that provides a quick overview of what tools are best suited for what purpose?
Print Workflow
When you add print to the online mix, you can quickly surmise that things get even more complicated. While I produced my LOCKDOWN preview chapter in Affinity Publisher, I had to abandon the program because it does not allow you to export text with formatting and links intact to a Microsoft Word or RTF file to help maintain content version control.
Adobe InDesignat least offers that capability, and now that it has arrived on M1 Macs, it may well be once again a viable choice to produce my next book.
The print workflow must also follow most of the online workflow tips:
Content Organization
Use Scrivener to gather content and create a hierarchy. Once chapter organization looks right, copy and paste to iA Writer, noting these procedures:
- All sub-documents should have collapsed hierarchies because subdocuments are not included when combining documents or Select All text is used.
- Do not embed any links or styled text; these do not transfer using copy and paste.
Editing
iA Writer creates markdown files that can be exported to Microsoft Word files with the following caveats:
- Lists should always be followed by an empty line.
- iA Writer does not add line breaks in Microsoft Word exports unless you use “Shift-Enter” each time, which is too laborious. The workaround is to copy and paste text to Bear and then export it to Microsoft Word. Bear correctly adds the required line breaks.
Combining Files
iA Writer can export a set of files, as described here:
The example above shows how to use iA Writer to create a table of contents. If your eyes glazed over, you’re not alone. Just use Scrivener to organize content properly.
iA Writer to InDesign
The problem with iA Writer not adding any line breaks to exported text is a fundamental workflow impediment. I’ve been in touch with the developers and received a “that’s the way it’s supposed to work” answer. Use this workaround to address this problem:
- Copy text from iA Writer to Bear.
- Export a Word file from Bear.
- Use InDesign to find “Normal” paragraph style and replace it with the style used for your final formatting, in my case, “Body Text – Justified 9/12.”
- Search and replace “Heading 2” paragraph style and replace with “Subtitle – 14/12 SB21 SA9 Cool Blue.”
- Search and replace “Quote” paragraph style and replace with “Pullquote 9/12 LI12 RI12 SB7 SA7.”
- Search and replace the “List Paragraph” style and replace it with “Bullet List.”
You should create a similar list of to-dos to match your style sheet.
InDesign to iA Writer
Finally, to move files from InDesign back to iA Writer here’s what I do:
- Export InDesign text in RTF format.
- Import the RTF file into Bear.
- Copy and paste text from Bear back to iA Writer.
All these workarounds suggest that the world of digital publishing needs to focus more on usability and tighter integration. That so many steps are necessary to maintain data integrity between content platforms is utterly ridiculous in this day and age of space travel. Now you know why I always champion simplifying digital tools to improve the user experience.
